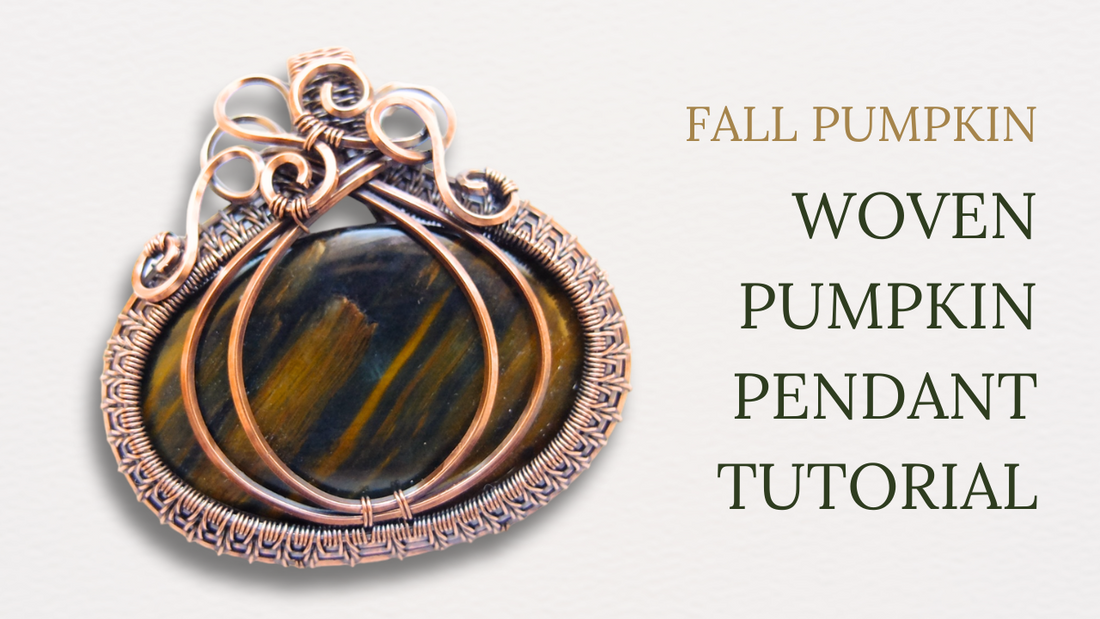
"Fall Pumpkin" Wire Wrapped Pumpkin Pendant Tutorial: Step-by-Step Guide
By Elizabeth SchultzIn today's tutorial, we'll walk through how to create this adorable woven pumpkin pendant. I’ll guide you through crafting the woven frame, creating all those delightful swirly elements, and using square wire for a unique twist. But don't worry if you don’t have square wire—round wire will work just as well!
Let's jump right into the materials and tools you'll need to get started.
Tools and Materials
- 20-gauge square wire (6 segments, 11 inches or 28 cm each)
- 28-gauge weaving wire (at least 3-4 meters or 10 feet)
- Oval cabochon (approximately 35 mm x 22 mm)
- Chain nose pliers
- Round nose pliers
- Flush cutters
- Ruler
- Sharpie
Step 1: Prepare the Wire Segments
Begin by laying out your 20-gauge square wire segments on a ruler. Mark the halfway point (about 5.5 inches or 14 cm). Then, mark about a quarter of an inch (0.6 cm) on either side of that center mark. These markings will serve as guides for your weaving.
Step 2: Set Up the Wires for Weaving
Place your wires into a clamp for easier weaving. A spring clamp or ring clamp works well, but if you don’t have one, you can still manage by carefully holding the wires in place. Once clamped, straighten the wires to ensure they lie flat next to each other.
Step 3: Begin the Flame Weave
Now, grab your 28-gauge weaving wire. Leaving a long tail (about 5 feet or 1.5 meters), wrap the wire three times around the third base wire from the top.
Next, bring the wire between the third and fourth base wires, then wrap it around the fourth and 5th base wire and so on until you reach the "bottom" base wires. Then, begin to weave around each pair of base wires back towards the top, creating a flame weave. This weave adds texture and detail to your pendant.
Step 4: Continue Weaving the Frame
Weave the flame pattern until you've reached about half the circumference of your cabochon. To measure this, you can use a piece of blue masking tape wrapped around the stone, marking where the ends meet. Alternatively, estimate the weaving length by placing it against the stone.
Once you've woven about an inch and three-quarters (4.5 cm), stop. Repeat the same weaving pattern on the opposite side of the wires.
Step 5: Form the Pendant’s Frame
With both sides woven, it's time to start shaping the frame. Gently curve the wires upward using your cabochon as a guide. This will form the oval shape around the stone, creating the pumpkin's outline.
Step 6: Create the Bail
Once you've got the frame where you want it, now it's time to create the bail. Pull 2 wires to each side leaving 4 wires in the center. Use the "Modified Soumak" weave to weave them together. Start by wrapping the right base wire 3 times to start the weave, then weave each two base wires together, then the final base wire once. Continue weaving until the bail is about 1" long.
Step 7: Create the Pumpkin’s Dimension
Now, let’s add some dimension to your pumpkin. Separate the bare base wires at the front of the pendant and gently curve them in front of the bail. Cross them over each other at the center and then bend them towards the back. Trim any excess wire and tuck it securely into the back of the frame.
Step 8: Stone Setting
Now, it’s time to set your cabochon. Place the stone in the frame and bring the wires from the bail downwards and swirled up the back of the stone. Secure the swirls to the frame with weaving wire. Once the are secured to the frame, you can tighten any swirls to better help hold the stone.
Step 9: Add the Swirly Details
Now comes the fun part—creating those beautiful swirls! Start by trimming the ends of the wires just outside the frame. Use your round nose pliers to create swirls on each wire. You can make them as tight or as loose as you like, depending on your design preference.
Step 10: Secure the Swirls
With your swirls in place, it’s time to secure them to the frame. Use your weaving wire to attach each swirl to the frame, wrapping the wire around both the swirl and the frame. This will ensure that your swirls stay put.
Step 11: Finish and Polish
After securing the stone and adjusting your design, give your pendant one final polish. You can also oxidize the wire if you prefer a more antique look, which will bring out the texture and depth of your weave. You can learn more about this process here.
Conclusion
And there you have it—a beautiful, handmade fall pumpkin pendant! This piece is not only a celebration of the season but also a testament to your growing skills in wire weaving. If you enjoyed this tutorial, be sure to check out my other projects, including the new "Elvira" coffin pendant tutorial, perfect for the upcoming spooky season.
If you'd like to have access to all written tutorials, consider signing up for the Artisan Tutorial Vault!
- - - - - - - - - - - - - - - - - - - - - - - - - - - - - - - - - - - - - - - - - - - - - - - - - - -
I hope you enjoyed this article and found it helpful in creating your own beautiful jewelry. If you have any questions or want to share your work, don't hesitate to reach out.
Happy weaving!
