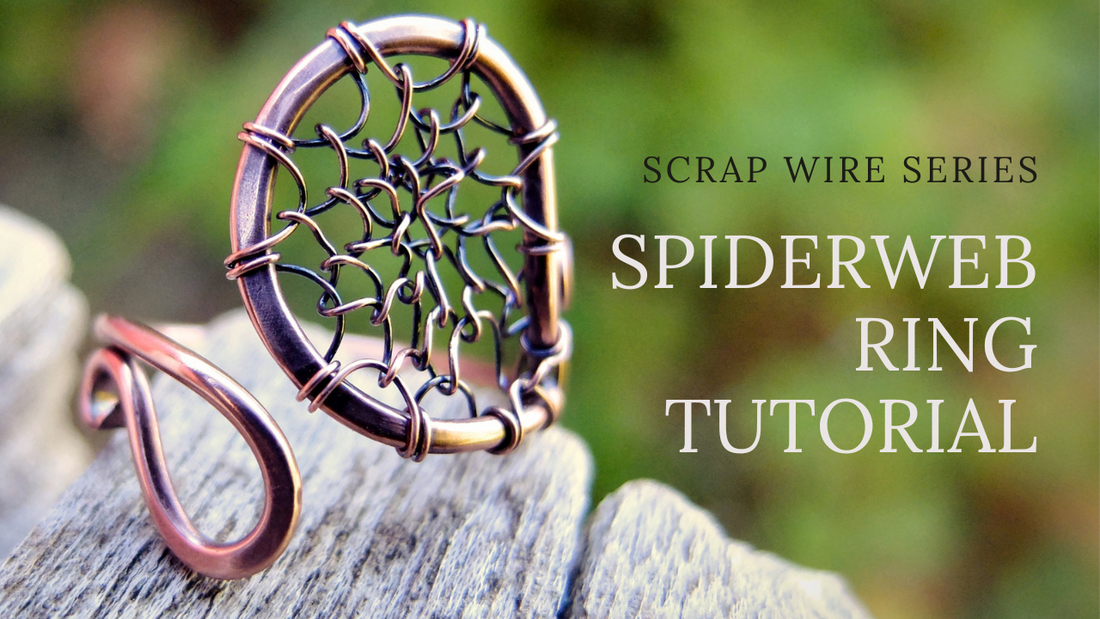
Spin Your Own Spiderweb Ring! Step-by-Step Guide
By Elizabeth SchultzIn this tutorial, we're going to walk through how to create a stunning Spiderweb ring using cold-forging and lace weaving techniques. This tutorial is especially great if you’ve got some leftover scrap wire laying around. Plus, it's a great way to celebrate the Fall and Halloween seasons!
Tools and Materials Needed:
-
Wire:
- 16-gauge round wire (approximately 5 inches or 13 cm).
- 28-gauge weaving wire (about 10-12 inches of 25-31 cm).
-
Tools:
- Chain nose pliers or flat nose pliers.
- Round nose pliers.
- Flush cutters.
- Sandpaper or sanding pads (600, 1000, 2000, and 3000 grit).
- Needle file (or any small file).
- Steel bench block.
- Chasing hammer.
- Ring mandrel.
- Dapping tool or dowel (12 mm in diameter or similar).
Step 1: Prepare Your Wire Begin by hammering the end of the 16-gauge wire flat. Place the wire on your steel bench block and, using the chasing hammer, gently "drop and drag" to spread the end of the wire flat.
Once the wire is flattened, use a needle file to smooth the edges. Round off any sharp points, ensuring a smooth finish for the ring's swirl.
Step 2: Create the Swirl Using round nose pliers, grasp the flattened end of the wire and create a swirl. Gently apply pressure as you twist the wire, using your non-dominant hand to guide the wire around the pliers.
Step 3: Add Texture Place your swirl back on the steel bench block. Hammer lightly along the outside edge of the loop to add dimension and texture. Make sure you avoid hammering the inside of the swirl.
If the shape becomes distorted, use round nose pliers to gently reshape the inner swirl.
Step 4: Shaping the Ring Now, take your round object (dapping tool or dowel) and wrap the wire around it, creating the larger loop where we'll create the "web". Adjust the curvature until it looks right.
Once you've shaped the ring, place it on your ring mandrel and adjust to the correct size. I’m working with a size 6, but you can modify based on your preference. If you're making a larger ring, you may need more wire. (Keep in mind that this ring is adjustable).
Step 5: Creating the Final Loop Once you've wrapped the wire around the mandrel, then hammer the end of the wire with your chasing hammer. Next, create another loop on this end. Then, curve the wire towards the outside of the ring and hammer the outer part of the curve to add dimension.
Step 6: Finishing the Ring Band Now, place the ring back on the mandrel and hammer lightly with a rubber mallet or nylon hammer to gently curve the ring band.
Step 7: Polish the Ring Use sandpaper starting with 600 grit, gradually working your way up to 3000 grit, to remove any unwanted tool marks or hammer impressions. This gives the ring a smooth, polished look.
Step 8: Create the Web Design Grab your 28-gauge weaving wire. Attach the wire to the base of the ring band by wrapping it three times tightly around the shank. This anchors the weaving wire to the ring.
Start wrapping the wire around the swirl one time to secure the larger loop. Now, begin forming the spiderweb pattern by looping the wire over and through the ring shank, alternating directions as you go. Each loop should be evenly spaced to give the web its characteristic shape.
Step 9: Complete the Weaving Continue weaving your wire around the perimeter of the ring going through each inner loop. If you run out of weaving wire, wrap it around the closest loop two times and tuck the ends in with your chain nose pliers to secure it.
Step 10: Add the Center Web As you approach the center of the web, crisscross the wire through the loops, pulling the web tighter and closing the gaps. This creates a strong and intricate central pattern.
Trim and tuck any loose ends once you've finished weaving.
Final Touches: Once your spiderweb design is complete, you can adjust the loops and web to add more shape. If needed, you can further texture or curve the web by gently pulling it into place with your round nose pliers.
Conclusion: And there you have it—a stunning Spiderweb ring! This piece combines both structural and decorative elements for a one-of-a-kind look. Whether you keep it for yourself or gift it to someone, it’s sure to impress!
- - - - - - - - - - - - - - - - - - - - - - - - - - - - - - - - - - - - - - - - - - - - - - - - - - -
I hope you enjoyed this article and found it helpful in creating your own beautiful jewelry. If you have any questions or want to share your work, don't hesitate to reach out.
Happy weaving!
